The Steel Hay Wagon – Wagon Series Part 3

Part three of my series on hay wagons is less for the woodworker and more for the welder.  I can’t imagine building this at current steel prices but, in a pinch, it would do and seems it will last forever.  This too is a guest post from my father.  I’ll hand it over to dad now.
Back to the farm auction.
Here I am hands in pockets, lots of temptations at another farm sale.  This time a neighbor is selling his equipment. He is cleaning out his sheds as he is quitting farming and has rented out his farm to a high rent farmer.
I am doing pretty good, I only bought a sloppy joe and a soda so far.  Then there is this old flat wagon with a steel bed.  The tires are holding air.  “Alright boys what am I bid for this wagon? $250, 200, come on what will you give? $100, $50, here 50 now 60,70,80.”. Who bid $90?  Oh that was me!  “$90 once, $90 twice, sold for $90 to that fellow.  What’s your number sir?
SteelWagon1
There you go, a $90 wagon that has hauled thousands of bales through the years (maybe 15 years).  And has been a work bench, a storage unit, hayride wagon…you get the idea.
SteelWagon2
We had our first flat tire on this wagon this year and that is the only repair we have had on it in maybe 15 years.  This wagon has a diamond tread on the deck but it still gets slippery, especially with loose hay.  [Editor’s Note: the deck can also get hot!]
Someone told me once every auction has a soft place, this auction had a cheap hay wagon.
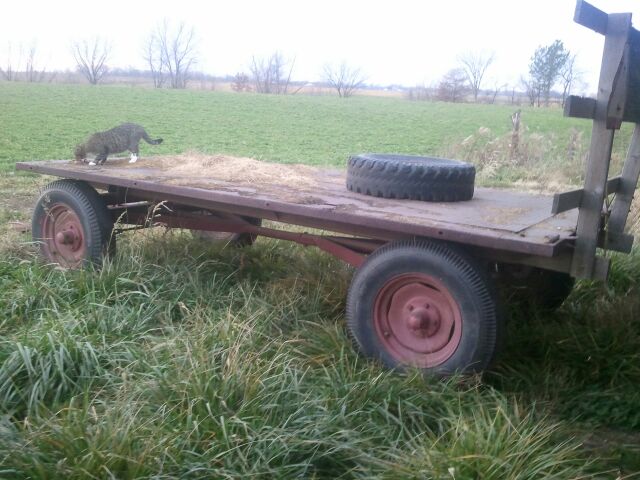
The construction is simple and straightforward.  Instead of wooden runners they used a pair of I-beams.
SteelWagon3
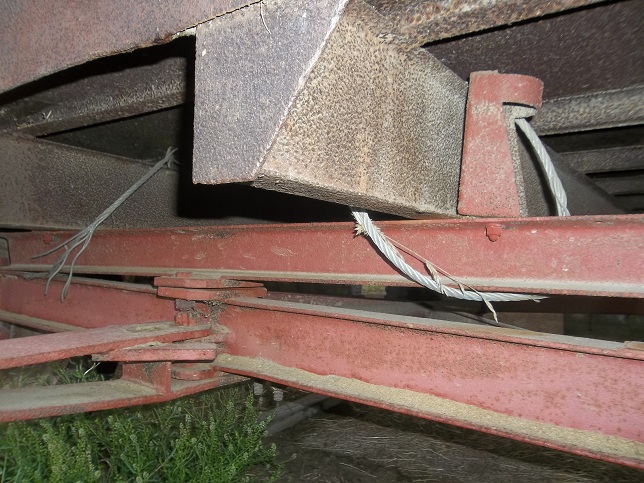
There is a frame of bent steel around the perimeter and the tread plate top supported by U-shaped joists on 14″ centers.  In the rear we bolted a 2×4 to each I-beam to support our headache rack.
SteelWagon4
The headache rack is also held on by a couple of brackets up top.  It’s easy to remove the headache rack this way…just 4 bolts.
SteelWagon5
One of these days we may go crazy and paint it. Who knows.

The One Hundred Twenty Dollar Hay Wagon (Wagon Series Part 2)

Part two of our Hay Wagon series is a guest post from my father.  You’ll see comments from “Not Caretaker” from time to time…that’s him.  Don’t be fooled by the pictures.  This is a great hay wagon and cost about half as much as any of mine and pulls straight.  We have put thousands upon thousands of bales on this beauty over the years.  Let me step out of the way and had the microphone to dad.

I would describe myself as thrifty.  That said I am willing to repurpose rebuild or do without.  I bought a wagon running gear from a local fertilizer dealer for $100.00.  It had an anhydrous ammonia tank on it at one time.  This running gear had one distinction from most other running gears in that the whole front axle turns on a center king pin where the usual farm gear steers like a car, both front wheels turn together with a tie rod.   Either running gear will do but the gear like this one will follow whatever is pulling it quite well.

At about this same time I was at a farm auction trying to keep my buyers number in my pocket.  The auctioneer came to a pile of used lumber (oak, spruce) of various dimensions and lengths.  Some of this was new 16’ lumber that had been use for concrete forms .  “What am I offered for this lumber?  $25, $25, $20, $20, ok boys someone start off, what’ll you give?”  I heard myself say “$10”.  The auctioneer said “alright I got $10, give me $15, $15, $14,$11, sold for $10 to number 313”.

Back to how to build $120.00 hay wagon you can see where the money is going.  I sistered  two of the 2X6X16’s together to make a stringer for the foundation of the wagon bed.  Made two of them and fastened them to the wagon gear about forty inches apart.  Then I used 8’ oak boards for the deck and nailed them across the stringers placing them about an inch apart basically building a deck like you might have on your house.  The spacing of the deck gives the guy riding the wagon a good footing and is not slippery like the solid decked wagon written in the first of this series.

There you have a plan for an economical wagon.  You may not be able to buy a used running gear  that cheap as iron prices have driven up the price of farm machinery , but there are still bargains out there.   Used lumber is still a bargain you just have to find it.

Now I want to mention  something about using these wagons.  We stack bales right off the wagon (see videos in earlier posts).  I had an old neighbor, Tommy M, who helped me bale until he retired.  He would run the baler and I would ride the wagon and stack hay.  He always told me he knew how fast to drive by looking back at me, if my tongue was hanging out and I was breathing hard he knew he was driving fast enough.  How I wish he could still drive the baler.

Now that I drive the baler and Head Farm Steward rides the wagon, I know just how fast to drive.

HFS again.  In case you missed it, Part 1 is here.

Looking up a Hay Wagon’s Skirt Part 1

I get a ton of searches for “hay wagon rebuild” or something similar to that.  I assume readers are looking for these two articles.  Those two aside, I think I can provide more detail.  So, this is the first of a series looking under each of the four wagons on our farm and my thoughts on each one.  Hopefully you’ll find them to be helpful as you plan out your next hay wagon rebuild.

This is the wagon we rebuilt above.  It really isn’t a hay wagon, though we used it as one this summer.  It’s a grain wagon, complete with sides.  It was pretty rotten when we hauled it home and we are working to rebuild it as time allows.  Time hasn’t allowed so it’s still just a flat platform.  We used the original design as our pattern when rebuilding this one and it turned out well.  Most of the iron we need to rebuild it as it was is laying on the bed waiting for me to clean it up.

The running gear is sound.  It has good rubber and turns well in both directions.  You may not realize why that’s important so just trust me.  It’s important.  We bolted two 4×6 beams to the rear of the running gear.  This allows the front to flex over uneven ground.

Above the beams we knotched 2x4s to support the floor.  These could be doubled up.  Each are bolted to an angle iron which is then bolted to the 4×6.  We knotched them to match the design of the previous bed.  It helps to keep the bed lower to the ground.

Then we used treated 2x tongue and groove flooring across the platform.  The surface can be a bit slick but it’s solid.  We started with a reasonably straight board and the tongue sticking out on the edge which we later cut off.  Each board was …convinced… to snuggle up to its neighbor.  Finally we put 2×4 edging around the bed.  This should be a 2×6 because of the thickness of the floor but we were anxious to get into the field.  I have since purchased the 2×6 edging but, like so many other things, haven’t installed it yet.

Finally we attached a headache rack to the back.  Maybe it looks a bit hoosier but when it’s time to bale, it’s time to bale.  We had to get on the road.  It worked so it stayed even though one of the scrap boards we made it with has broken.  (Just to show how cheap I am, one of those horizontals are discarded treated boards from my father-in-law’s fence.  A fence he built 5 or 6 years ago.)

So there you go.  You can stretch them out so they are long and heavy if you want but I prefer them to be shorter.  There are any number of ways to build your deck on the running gear and I’ll be detailing our other wagons soon.

Hay Wagon Rebuild Part 2

Yesterday we got the materials lined up so we could rebuild the wagon.  Today, after a long, hard day we got the wagon back together.

The kids were all there helping grandpa while I was at work.  I came home in the afternoon and we got it wrapped up just in time to bale up the alfalfa.  The wagon isn’t really finished, we just did enough to use it to haul hay.  It was originally grain-tight with side walls but those will have to wait.  We were running short on time so we just threw together a headache rack out of scrap material.  We have plans for something more permanent.

Then off to the field.  We had a couple of hiccups with the baler but the bales are tight and heavy.

Dad drives the baler, I catch, carry and stack the bales.  It was a little breezy and about 75 degrees.  I wish all baling weather was as nice.

Here’s the rebuilt wagon loaded with hay.

We have quite a bit of metal to put on to hold the sides in place…once we build new sides.  But it’s not an impossible project.

The icing on the cake was the ant colony that had moved into the hay elevator motor.  The motor burned up so we couldn’t unload the wagons.  Oh well.

Hay Wagon Rebuild Part 1

Dad and I drove to Calhoun this winter in response to a CL listing for a hay wagon.  The price was right so we brought it home.  Originally this wagon was grain tight.  Years of outdoor storage had taken its toll on the wood and there really wasn’t much left of it.

All of the sub-frame was both broken and rotten.  There were numerous attempts to cobble things back together again but even those were failing.  The running gear was sound and the tires were good.  That’s about all I had to work with.  That was enough for the money.

I used it as it was for a few months hauling brush to my wood chipper but now that hay season is upon us, I need my hay wagon.  Dad measured the wagon well and we plan to rebuild the deck just as it was originally.  That will take some doing as most of the hardware has seen better days.

Dad began the long process of disassembly a few days ago.  It would be nice to paint the frame with the bed off but the schedule just doesn’t allow.

I need this wagon today.  Can we finish it in time?  I need to stop burning daylight and go drill some holes before work!  I’ll offer more details including costs in part 2.