Composting Winter Bedding

Our primary compost pile is a little long in the tooth and totally stuffed.  I had to build a new pile to handle the winter bedding for goats and chickens.  I began with a 5 foot ring of fencing, 4 feet tall.  I piled used bedding into it but any carbon will do: straw, leaves, etc.

I left the center open to give me a pocket for smelly organic wastes.  In this case, four 5-gallon buckets of kitchen scrap.  This can be anything that will rot from watermelon rinds to coffee grounds and filters to paper plates.

Finally, I added a good layer of carbon to the top to keep the odors in and the flies down.  Remember, if you can smell it you need to add carbon!  People often add a layer of wire mesh to the top to keep animals from digging into it.  I’m not too concerned with this pile but when I add chicken offal I will protect it from our wildlife.

So there you have my 5′ diameter, 4′ tall overflow compost pile.  I should note that while it is dry I leave the top dished out to capture as much rainfall as possible into the dry pile.  Once it gets nicely soaked I’ll probably change that.  If this pile still exists in July I expect it will steam even on the hottest days but it should be fertilizer by then.

Out to Pasture

Last year the goats hatched an escape plan around March 20th.  This year we headed them off by opening the grazing season early.

There are a number of weeds growing right now and the girls are eating them up.  Well, everything but the thistle.  I guess when there is fresh, soft and tender you don’t mess with the fresh, course and thorny.

This is the same plot that had 3 pigs rooting on it last July.  The pigs above really gave the pasture a workout then we let it rest and recover.  You can see the weedy mess that is our pasture.  We’re working on it.  The goats are helping.

The cows are still on stockpiled grass while I’m waiting for the grass to really take off.  I plan to put the cows in with the goats and rotate them together.  We’ll see what really happens.

Extreme Makeover: Farm Edition

The old farm has seen better days.  Even the mailbox is broken.

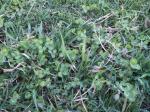
The fences are in disrepair, the pond is nearly silted in, the pond dam is infested with minks, I have acres of Osage orange, honey locust and willow, the pastures have more ragweed and thistle than grass, the buildings are falling in, the well doesn’t work…I could go on.  Most of the issues I face are simply due to age.  Things get old and need to be replaced.  In my case, nearly everything needs to be replaced.  The good news is I catch a lot of sunshine and rain so building fertility shouldn’t be too difficult.

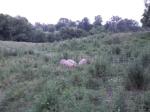
My family has owned this farm since the 1840s.  It is my turn to fight back the brush, tame the earth and hand it to the next generation more productive than when I received it.  You know, stewardship.  This is a job I volunteered for and accept willingly.  In fact, it is easy to make dramatic productivity improvements right now since all I have to do is open up the canopy to let the sun come in and manage rest and disturbance cycles.

Well, it’s not that easy. I put a lot of thought into which projects receive priority. I appreciate Geoff Lawton’s notion that I should put 30 hours of thought into an hour of work but I’m looking out my window at thousands of hours of thinking.

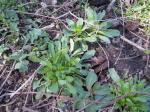
It is difficult, as Joel Salatin points out, to look at the landscape and ask it, “What do you want to do?” instead of, “What can I make you do?”  This hill is quite good at raising hedge trees.  Does that mean it would be a good place for an orchard?  It is a small hill sloping North, West and South with a spring in the SW corner just East of the White Oak.

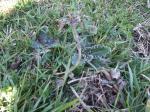
Let me show you why this matters.  Here is a path the cows have carved on the west side of a hill between fallen limbs, hedge trees and multiflora rose.

I promise you the hill doesn’t want to be scarred this way.  I have to find a way to heal the scar.  I could hire a bulldozer to come in and remove all trees and stumps and sculpt the hill.  That would be a good use of my time.  However, it would leave the soil exposed just as the spring rains are coming in.  I think it is better to manually remove the trees, burning, chipping and piling them as I go, then build my temporary paddocks in a way that prevents the cows from beating paths like this one.  I want to use hooves as rolling pins.  Solar-powered, fertilizer-spreading,  rolling pins that replicate.

I will spend the rest of my life remodeling this farm.  Right now it’s all I can do to manage 20 acres.  Hopefully I’ll develop more skill at recognizing natural patterns so I can partner with, rather than fight, nature.  Wish me luck.

More manure than you bargained for

We have all had a cold this week so I am delayed in cleaning the brooder. Today I hauled out three wheelbarrows full of chicken manure/sawdust from the broilers.  This is a normal amount but the bedding is more soiled than normal.

I returned with two wheelbarrows of composted sawdust.  Under the watering nipples the bedding was completely soaked.  Any feed that falls there ferments and whole kernels sprout.  As I scrape and shovel I have many little helpers looking for something tasty to eat.

I have shoveled out the bedding on the left, you can see a dense layer of manure on the right.  I work to be as honest as possible on this blog.  I want you to really see how it is.  Birds poop.  A lot.  If you are not able to stay ahead of it (like, when you get a massive head cold) the poop gets ahead of you.  Adding bedding is a daily chore, leaning toward twice daily as the chicks grow.  I can’t wait to move them to pasture next week.

When we went to the Missouri Organics Conference we met with Jay Maddick of Campo Lindo Farm.  He raises broilers start to finish in hoop houses with access to the outdoors.  I can’t imagine where he sources fresh chips, how he handles soiled bedding and how he manages to compost it all.  I am anxious to visit his farm and find out.  Oh, the compost!

Believe it or not, chicken manure is a topic of much discussion online.  This is what I believe your broiler poop should look like (Please note the lack of blood in their stool):

I have only gotten bird poop that looks like bird poop, as opposed to runny yellow fluid, by feeding Fertrell suppliments.  Purina Sunfresh goes in yellow and crumbly and comes out yellow and runny.  Same for Dumore.  When we started grinding and adding Poultry Nutri-Balancer we saw a huge change in consistency and in animal health.  We also saw the end of curly toe in our chicks as that is indicative of a riboflavin deficiency and Nutri-Balancer has kelp.

You can see in the picture, our broilers get more than just feed.  Today they got turnip greens fresh from the garden.  Dad always plants too many turnips so we end up carrying them through till spring.  Also, I gather hay chaff in the late fall.  I dump in several handfuls of alfalfa chaff each day.  I can’t promise you’ll taste the difference by adding greens.  I can only tell you my chickens are healthy, happy, have interesting things to peck at and play with, a varied diet and healthy-looking manure.  When a customer stops by to see how their chickens are doing, I hope they are pleased with our efforts.

Ghosts of brooders past and present

Chickens are a good place to start.  They are small, require a small investment and a quick turnaround.  We started with layers we ordered from a hatchery and, boy, were those city postal workers surprised when the package came through.  I built a brooder out of a 4×8 sheet of plywood saved after a home remodel job sitting on another sheet of plywood I got from my neighbor’s trash.  Yeah, we didn’t fit in the suburbs.  Please notice the heat lamp hanging from a scrap strip of pine board.  Not the best idea but chickens seem to manage in spite of owner inexperience/foolishness/incompetence.

We also used this brooder for the first few batches of broilers but a 3’x5′ brooder is cramped quarters for 50 broilers.  We tried raising 100.  Out of desperation we rapidly graduated them to a portion of the greenhouse…the old, tiny, PVC, ultimately-destroyed-by-a-strong-wind greenhouse.

The following year we used a cracked 300 gallon watering trough for a brooder.  Talk about an improvement!  Here it is brooding our turkey poults with broilers.  (They bunched up for the picture…)

Then things got out of control.  We were running 150 chicks in a batch, slaughtering every other Saturday so we built two of these outside:

This is an 8×8 brooder with four heat lamps.  The lids on each side are full 4×8 sheets.  We use a Plasson bell waterer gravity fed by a bucket once the birds graduated up from the quart drinkers.  Here’s a shot of the birds as we pack them off to pasture:

I really feel the 8×8 brooder pictured above was excellent for our purposes.  The birds had room, fresh air, they were easy to access and safe from predators.  But what do you do when you move to 300 chickens per batch?  You move to the new greenhouse.  I built a 2′ tall 4×4 brooder that the chicks can enter and exit under each side.  There are four lamps inside on two switches so temperature regulation is easy.

Now, I want to point out some major advantages of the current brooder and changes to this year’s management.
1. We moved away from quart or gallon drinkers and picked up some watering nipples.  These are screwed into a PVC pipe, gravity fed from a bucket.  The pipe wraps around all four sides of the brooder.  The birds can’t scratch manure into the bowl since there is no bowl.  This is a huge plus to animal health.
2. We are now using course hardwood sawdust for bedding.  I had 4 tons delivered for $130 as opposed to the pine chips used in previous years that were $5/bag or something like $1500 for 4 tons.  Plus the hardwood chips have been outside for months and are full of interesting things to peck and scratch.
3. Space available to the chicks is only limited by how many straw bales I want to surround them with.  They have room to run and run they do.
4. The top of the brooder is a large, warm, dry area perfect for starting my bedding plants.
5. With everything out in the open, it is a simple matter to add bedding, fill feeders or do whatever needs done.
6. This was cheap to build.   It’s one and half 3/8″ pine sheets and an 8′ 2×4 with four ceiling light boxes, four bases, 8-10 feet of wire, two switches and a plug.  I think it took about 40 minutes to put together and wire up.
7. It is easy to just sit and play with the chicks.  We or our guests can just sit on a straw bale and enjoy the commotion.  That hasn’t really been possible before.

Everything changes.  Everything has to change if I am going to create the best possible environment for my animals.  I have to try something, observe, record, reflect and try again.  Thank God we do this work seasonally so I have time for reflection.

In the beginning…

In the beginning we were totally clueless living in suburbia.  It was bad.  We brought in the chickens 2 by 2, male and female.  There was much rejoicing in the home but it was totally illegal.  So we sold the house, bought the family farm and moved home.

Time passes….thousands of chickens …erm…pass…

Several years later we feel we are ready to really get started.  We have built a small business raising and selling pastured broilers (meat birds), pastured turkeys and pastured hogs.  We also have goats for home milk production and a couple of jersey heifers.

We have reached the point where we either have to start telling customers “No” or we have to grow.  300 broiler chicks arrive in two weeks.  200 layer chicks arrive in three weeks.  You can see what we have decided to do.