
My standard advice to someone interested in raising broilers is to read Pastured Poultry profits then raise 25 birds in the fall and see what it’s all about. You should be able to get in and out of 25 birds for under $500 counting equipment and still have enough birds to make processing day worth the effort. It is also the usual minimum for shipping chicks. 25 gives you enough birds to eat through the winter with a few extra to share with loved ones or neighbors. It also leaves you a margin for error. And you will make mistakes. This first batch will take you to school. That, in summary, is what this post is all about.
The Complete Formula
Spend the month of July preparing for chicks to arrive on August 15th (or 8 weeks before your first frost). Find a hatchery within about 4 hours of you to minimize stress on the animals and so you can drive there if the weather is hot on shipping day. We have had some bad experiences with the postal service in hot weather so it might be better to just go pick them up.
Birds
We are big fans of the Cornish Cross. Our friend Darby likes the S&G Heritage White. Others like Rangers. That’s all well and good but I want you to get in and get out of birds in a hurry. CX are a suitable, inexpensive bird and will provide your general education while finishing on pasture in 56 days. Also, white feathers are easier to pluck than red or black feathers. 25 birds shipped from Schlecht Hatchery would have cost me $43.25 in Fall of 2013.
Feed
I’m going to suggest that you go ahead and use (gasp!) Purina Sunfresh or something similar but add a dollop of yogurt and some kelp…better yet, buy a bag of Fertrell Poultry Nutri-Balancer (PNB). I realize this won’t satisfy a desire for whole grain, non-GMO feed but it will get you overcoming inertia. In 8 weeks the birds should be around 5 pounds. You need 3+ pounds of feed to make 1 pound of bird so you will ultimately need 375 pounds of feed to raise 25 birds. Make that 400. 8 bags of feed at $17 each will run you $136. We add fish meal for the first two weeks to bring the protein level in the feed up from 19% to 21%. Obviously this adds to the feed cost. If you can’t find fish meal use game bird feed for the first 2 weeks. Right now 26% game bird feed is cheaper than 19% grower. Add in the kelp and/or the PNB and you are more in the $175-200 range. Just totaling chicks, shipping and feed brings costs to something like $1.94/pound of packaged meat. Economies of scale are working against you…don’t be discouraged. You aren’t producing the kind of bird you can buy in the store so don’t compare your prices to theirs.
Chick Arrival and First Few Days
I want to start this section with a warning. Chicks die. No matter what breed, you are going to lose a bird or two. It is going to happen. You may find a dead bird in the shipping box. You may find a weak bird in the box…that you nurse along until it finally dies. Birds die. Birds that die after about 4 or 5 days are your fault. Before then, it’s just sad. Move on.
However, birds also live. Birds you think will never make it are running around the next day. Those are the birds to watch out for. It seems that birds that get off to a bad start never recover…meat birds are the worst at this. Friends have raised whole batches of birds after a brooder disaster (got cold) and they are always small, inefficient birds. Do things right in the brooder and everything goes better.
You will need some sort of brooder. For 25 birds you can get by with a 100 gallon poly water trough or an old bathtub and a red heat lamp that you can adjust if the birds get too hot. I like the poly troughs because there are no corners for birds to get smashed in, the sides are too tall for escape and there is no chance of a draft. Also the trough has other uses. Bed the birds on non-cedar wood shavings or chips and keep adding fresh shavings day by day. You will find that the bedding warms as it decomposes and things begin to make their home among the chicks adding protein to their diet and boosting the chick’s immune system. You won’t want to do this in your living room. For the first few days, feed the chicks in an upside-down frisbee. Dig down a little so the frisbee sits level with the bedding. The birds will make a mess with wasted feed but they’ll eat well. In a few days you should switch to a covered feeder. You should have at least one quart drinker in the brooder for your 25 chicks and you need to keep it full. Put a tablespoon of sugar per quart of water for the first two or three days and never give new chicks cold water. We have also found our birds try to stand in the drinker then risk hypothermia. We control that by putting marbles in the drinker bowl to just below the water level. The lip of the drinker should always be just below beak height so it stays clean. We find the most success placing the drinker on a brick buried in the bedding for stability. Add bricks as the chickens grow and as you add bedding.
You’ll need to watch brooder temps during the heat of the day and keep them warm at night. Gradually decrease the brooder temperature after 10-14 days by raising the heat lamp a little each day. The birds will soon feather out and will be strong enough to survive overnight without a lamp but there will also be heat coming from the bedding itself. When the weather is dry and warm for a few days in a row and the birds are well feathered out plan to move them out to pasture.
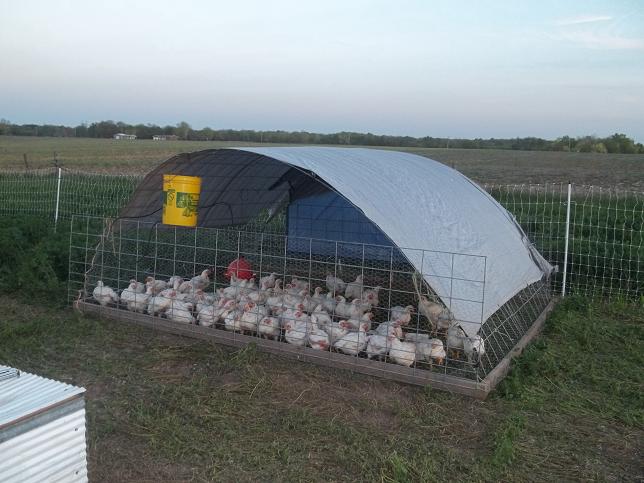
Chicken Tractor
We are big fans of chicken tractors. Go ahead and build a chicken tractor sized for 60 birds. If this turns out not to be your cup of tea you can either sell it or recycle the parts into other projects or uses. We have several designs and my favorite is the hoop made of cow panels. I have used these for chickens, pigs and as a greenhouse and it would make a suitable calf shelter. I feel that most of the plans online are overbuilt and very heavy. We just try to keep it as simple as possible…and not hurricane-proof. There are numerous advantages to hoop chicken tractors beyond their versatility. You’ll see what I mean when you help someone with a flat chicken tractor gather birds on butcher day…hands and knees in chicken poop. A tractor like this should take 2 hours or less to build.
You are going to need a dolly to move the chicken tractor. I’m not much at welding or fabrication so I traded a guy 8 chickens and he made this for me.
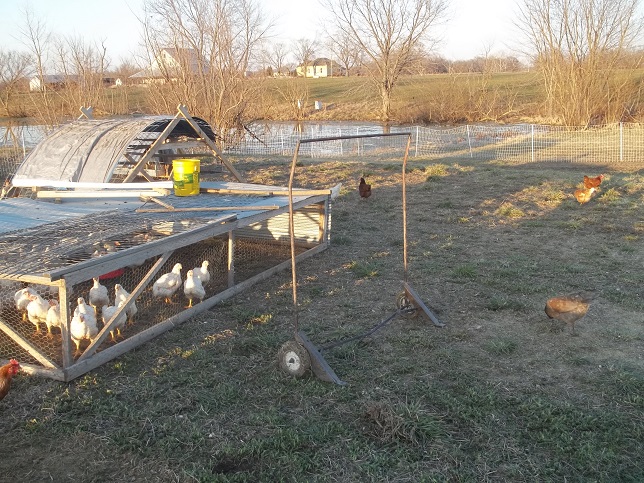 We based it on the pictures and description in Pastured Poultry Profits. Move the chicken tractors every day. When the tractors have more and larger birds you will need to move them more frequently. We find it is easier to move the tractors when the birds are hungry in the morning.
You will also need a way to water the birds. It is not uncommon to have 100 degree days in September and 90 degree days in October in Illinois so you should plan sufficient water capacity. We hang a 5-gallon bucket from the hoop and feed a Plasson bell waterer. The tractor and drinker should cost you around $160 to put together. You could skip the bell waterer in favor of a metal drinker but the bell stays so much cleaner it’s really worth it. Clean water is important.
Feeders
We use 4″ PVC cut in half for feeders. Remember, we’re going cheap here. Some feed falls off of the ends but the birds clean almost all of it up. Just buy a 10′ pipe, cut it into 5′ sections and rip the halves on a tablesaw…or have somebody else do it if you don’t have a saw. PVC tends to pinch the blade on the first cut so I think it’s better to make an incomplete first cut then finish later with a box cutter. I hope that’s clear.
Then take two 8″ lengths of scrap 2×2 and screw the PVC to a flat side to act as legs. This solution is cheap and should last as long as you want to raise birds. Each half of pipe should hold two quarts of feed. Put enough feeders in that all of the birds can eat at the same time. As birds grow you will need more feeders.
We usually let the feeders go empty by 6pm after the birds are 4 weeks old. We feel that letting the birds go hungry overnight boosts their overall health and increases our success rate with the birds. Less gain per bird but more total weight of live animals. Fewer flippers…birds that die of heart failure and you find them laying on their backs.
Processing
You can do this. You don’t need to buy a few thousand dollars worth of specialized equipment. You don’t need to rent equipment. You can do this.
You can do this. Say it with me. “I can do this.” I believe in you. You. Can. Do. This.
Go.
At a minimum you need a couple of sharp knives, a work surface outside (plastic table, tailgate), a bucket for offal and a pot of hot water.
Killing the bird is always an issue. I have a co-worker who joked that she was afraid of me because I am a remorseless killer of animals. Please understand, I am not without remorse. I’m a city kid. I cried when I killed my first rooster. The whole experience was emotionally draining and difficult and we ended up with this skinny little thing that was hardly worth cooking. It can be really discouraging to kill a rooster. Anyway, make a cone with a bleach bottle, screw it to a post and you are ready to go. Place the bird in the cone upside down. I hang on to both legs with my right hand and the wings with my left. When the bird is fully inserted into the cone I release my left hand and reach down to find the bird’s head. I put my left forefinger on the bird’s comb and my left thumb under the beak and pull down gently but firmly. Then I let go of the legs with my right hand grab the knife. Place the curve of the knife on the bird’s ear and push the knife through toward the back. If your knife is sharp you won’t have to saw. The knife will just go through. Don’t cut the windpipe or sever the spine. We just want to cut deep enough that your right hand gets covered in blood immediately. Then repeat the same cut on the other side of the bird’s head.
The bird will die in just a few seconds then the nervous system will begin to twitch. The cone acts to restrain the bird as it begins to twitch and thrash preventing it from breaking wings or bruising meat. In just a few seconds we are ready to scald the bird.
Plucking a bird is a breeze if you scald it correctly. All that expensive equipment just makes the scald and pluck fast when handling hundreds of birds. You are probably going to process 5-10 birds at a time. All you need to do is heat water on your stove, carry the hot water (carefully) outside, add a dollop of dish soap to the water and get to work. You might prefer to heat the water on a turkey fryer. Whatever, just don’t spend money here. Your water should be 145 degrees and you should swish the bird gently up and down in the water for 60 seconds. At that point the feathers should pull out easily. If you soak longer or hotter you risk cooking the skin and it will rip off when you pluck. Shorter or cooler, you’ll have a hard time getting feathers to release. You may need a pliers for pin feathers. I find it helps to hang the bird by its feet and pluck from the tail to the head but we have plucked our share of birds just laying them on a table.
From here on out there are any number of informative videos that will get you through it. My favorite is the Featherman video showing Salatin but Grady Phelan put up a video of the whole process with a helmet cam that’s pretty cool.
With practice you’ll need around 30 minutes to process 25 birds but the first time you will need several hours to process 5. I suggest you start with 5 birds one morning and 10 more the next. That leaves 10 more birds for a third processing date. Those final 10 could be the smaller birds of the batch and holding off a week will give you a chance to change your setup, resharpen your knives and figure out how to do it faster. In just a few sessions your first 25 birds will be in the freezer and you’ll be eating like a king.
Reflection
You have the rest of the fall and all of winter to reflect on your chicken experience. What did you think? Was it everything you had hoped it would be? Will you go back for more? What will you do differently next time? Do you think this is something you could do as a business?
You have everything you need to grow out 60 birds at a time. Maybe add another stock tank or upgrade to a 300 gallon tank. Other than than, based on our experience, I would encourage you to keep working with what you have. With just what you have you could easily finish 60 birds every month from May through September if you wanted…300 birds! We splurged and bought a used whizbang chicken plucker for $400 and we did thousands of birds with that and a stock pot on a turkey fryer frame. We were several years into our business before we contacted Featherman and we bought our equipment with profits from the previous season’s sales. Don’t buy anything you don’t absolutely need. Repeat that to yourself. This applies outside of farming too.
Can you sell the birds?
We could write a book on how much we don’t know about marketing. There are three main things to consider here:
1. Is it legal where you live?
2. Is anybody you aren’t related to interested in your product?
3. What are your costs? How much do you have to charge to make a profit?
Be sure to pay close attention to #3. Your costs are not fixed. They are not. Really. You don’t have to own land to raise chickens. You don’t have to spend $500 to build a chicken tractor. You don’t have to buy (now I know this will ruffle some feathers) non-GMO organic coconut-based chicken feed for the first batch. You can get 80% of the way toward the bird you want to raise without breaking the bank. The best way to save money is to keep it in your pocket. But you have to spend some money along the way no matter what you do. Keep track of those costs. Keep track of your time. By just raising 25 birds you are missing any number of efficiency gains you will realize with larger batches later. For example, if you can’t process them yourself, you have to divide the trip to the processor by 25 birds instead of, maybe, 1,000 birds. You with me? But you have to pay for that education and this is part of it. 25 expensive birds from now and you’ll be well on your way to your diploma.
Beyond that, we find that customers want a bird that looks like a grocery store bird. Shrink bags cost a little more but we think they are worth it for the better storage and presentation quality.
So that’s it. You just have to get your feet wet. I’m sure I have left out important details but you won’t know what you don’t know until you go find out. When you do, feel free to email us or leave a comment. We’ll do what we can to help you out.
UPDATE:
After a little offline discussion I want to further emphasize the importance of actually reading those books you bought. I have nearly worn out our copy of Pastured Poultry Profits. Beyond that, we got some good brooder tips from Andy Lee in his books Chicken Tractor and Day Range Poultry. Also we found some helpful information in the book Raising Poultry on Pasture. But just buying the books won’t do any good. You have to read them. You have to grok them. If you only have the budget for one book, Pastured Poultry Profits is the one.
I also want to say that we run 60 birds in a 8×12 chicken tractor. That’s smaller than Salatin uses so we run proportionally fewer birds. And at times I wonder if they wouldn’t be better off with 50 birds per tractor…especially if the weather prevents us from butchering them on schedule. Watch your birds. They will tell you what they need.
